Digital Input
The digital inputs on the Arduino are what allow you to to read the state of sensors like switches — using it to switch ON/OFF an LED.
Digital signals: Unlike analog signals, which may take on any value within a range of values, digital signals have two distinct values: HIGH (1) or LOW (0). You use digital signals in situations where the input or output will have one of those two values. For example, one way that you might use a digital signal is to turn an LED on or off.
Digital Input Functions:
The Arduino functions associated with digital input signals that we will be using in this tutorial are: pinMode() and digitalRead()
pinMode (pin_number, mode): Because the Arduino digital I/O pins can be used for either input or output, you should first configure the pins you intend to use for digital I/O with this function. Pin is the number of the pin you wish to configure. Mode must be one of three values: INPUT, OUTPUT, our INPUT_PULLUP.
When mode is set to INPUT_PULLUP, a 20 kohm pullup resistor is internally connected to the pin to force the input HIGH if there is nothing connected to the pin.
digitalRead(pin_number): This function reads a digital value from a pin. pin is the number of the digital I/O pin you want to read. This function returns one of two values: HIGH or LOW.
Desition making (if, if-else)
if Statement (Conditional Statement)
The if() statement is the most basic of all programming control structures. It allows you to make something happen or not, depending on whether a given condition is true or not. It looks like this:
if (someCondition) {

// do stuff if the condition is true

}
if-else Statement
There is a common variation called if-else that looks like this:
if (someCondition) {

// do stuff if the condition is true

} else {

// do stuff if the condition is false

}
if- else if - else Statement The if statement can be followed by an optional else if...else statement, which is very useful to test various conditions using single if...else if statement.
if (Condition 1) {

// do stuff if the condition 1 is true

} else if(Condition 2)

// do stuff if the condition 2 is true

}

else {

// do stuff if the condition 1 and 2 are false

}
Learning Objectives:
1. Know how to conigure an Arduino pin for digital input.
2. Know that by "digital input" is meant that the port can be tested by a sketch to see if it has a voltage.
3.Know the switch operation and different types of switches.
4. Know how to wire a push button such that a voltage is applied or removed from an Arduino pin if that button is pushed or released.
5. Be able to use if and if–else statements in the C programming language.
Task List
| Sl.no | Task and Reference |
|---|---|
| 1 | Define the pin number as a constant #define BUTTON_PIN 3 |
| 2 | Define the pin number as a constant pinMode(BUTTON_PIN, INPUT_PULLUP); The INPUT_PULLUP option is needed because an internal 20K-ohm resistor is pulled to 5V. This configuration causes the input to read HIGH when the switch is open, and LOW when it is closed. |
| 3 | Get the value of the input pin int value = digitalRead(BUTTON_PIN); This value can be 0 or 1, depending on the input. |
| 4 | Printing Push-Button value in Serial Monitor 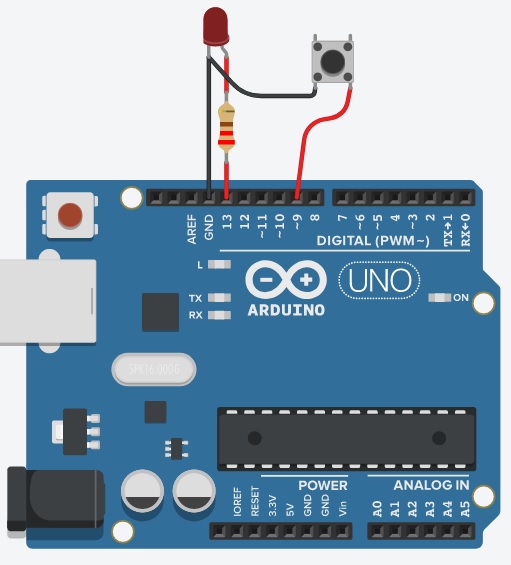
|
| 5 | Switch ON LED with Pushbutton |
| 6 | Using if-else |
| 7 | Toggle action with Push button#define BUTTON_PIN 9
|
Digital Output Vocabulary
Digital Input: Digital inputs are voltage inputs (0 or 5V) that are applied to the Arduino. In simple words, any push-button, switches or sensors produces digital inputs to a Arduino.
closed circuit:A circuit with a path for electrical current to travel from +5 volts to ground.
open circuit:An electrical circuit that does not provide current a complete path from +5 volts to ground. Often, a switch is part of a circuit in such a way that when it is set of the circuit is open.
ground:The zero-voltage counterpart to +5 volts. Electrical current will low between +5 volts and ground. On an Arduino, the three ground pins are marked GND. These pins are electrically identical and their use interchanged.
Push button :A push button is a momentary or non-latching switch which causes a temporary change in the state of an electrical circuit only while the switch is physically actuated.
Electrical Switch:A switch responds to an external force to mechanically change an electric signal. Switches are used to turn electric circuits ON and OFF and to switch electric circuits.
pull-up resistor:A high-value resistor, usually 10,000 ohms, connected between a digital pin and +5 volts to set that pin HIGH by default.
If statement:It takes an expression in parenthesis and a statement or block of statements. If the expression is true then the statement or block of statements gets executed otherwise these statements are skipped.
If-else statement:An if statement can be followed by an optional else statement, which executes when the expression is false.
If-else if-else statement:The if statement can be followed by an optional else if...else statement, which is very useful to test various conditions using single if...else if statement.