Arduino Digital Input/Output
The digital inputs and outputs (digital I/O) on the Arduino are what allow you to connect sensors, actuators, and other ICs to the Arduino . Learning how to use the inputs and outputs will allow you to use the Arduino to do some really useful things, such as reading switch inputs, lighting indicators, and controlling relay outputs.
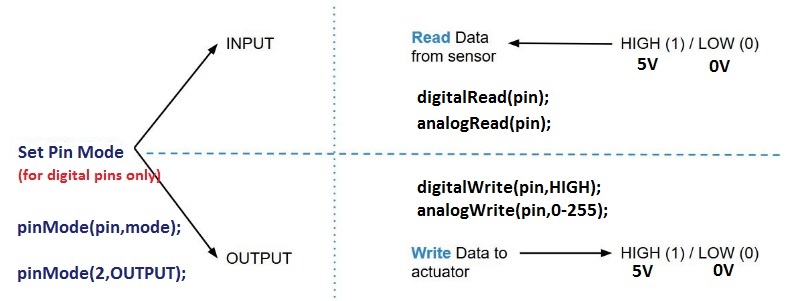
Digital signals: Unlike analog signals, which may take on any value within a range of values, digital signals have two distinct values: HIGH (1) or LOW (0). You use digital signals in situations where the input or output will have one of those two values. For example, one way that you might use a digital signal is to turn an LED on or off.
Digital I/O Functions:
The Arduino functions associated with digital signals that we will be using in this tutorial are: pinMode(), digitalRead() and digitalWrite()
pinMode (pin_number, mode): Because the Arduino digital I/O pins can be used for either input or output, you should first configure the pins you intend to use for digital I/O with this function. Pin is the number of the pin you wish to configure. Mode must be one of three values: INPUT, OUTPUT, our INPUT_PULLUP.
When mode is set to INPUT_PULLUP, a 20 kohm pullup resistor is internally connected to the pin to force the input HIGH if there is nothing connected to the pin.
digitalWrite(pin_number, value): This function writes a digital value to a pin. pin specifies which Arduino pin the digital value will be written to, and value is the digital value to which the pin is set. value must be either HIGH or LOW.
digitalRead(pin_number): This function reads a digital value from a pin. pin is the number of the digital I/O pin you want to read. This function returns one of two values: HIGH or LOW.
Learning Objectives:
1. Know how to identify the pins by number on the ArduinoUno.
2. Know how to configure any particular pin as INPUT or OUTPUT.
3. Know the meaning of and how to use the constants INPUT and OUTPUT.
4. Know how to set the output of a digital pin to HIGH or LOW.
5. Know the meaning of and how to use the constants HIGH and LOW.
6. Be able to identify an LED, including which lead is the anode (+) and which is the cathode(-).
7. Be able to identify a 220-ohm resistor and know its function.
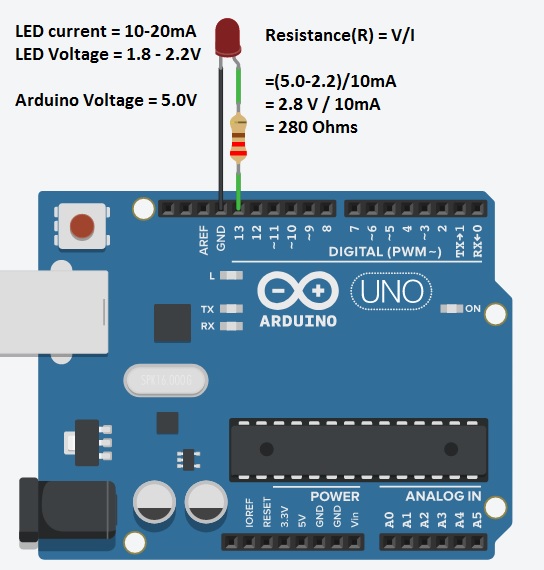
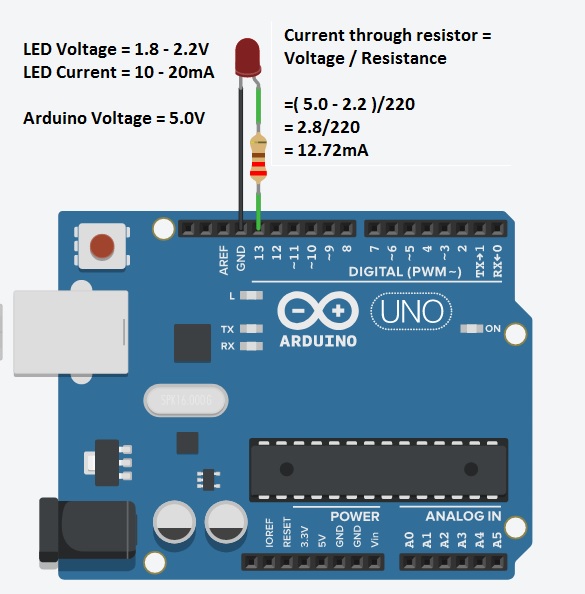
8. Find the current flowing through the 220-ohm resistor using ohms law.
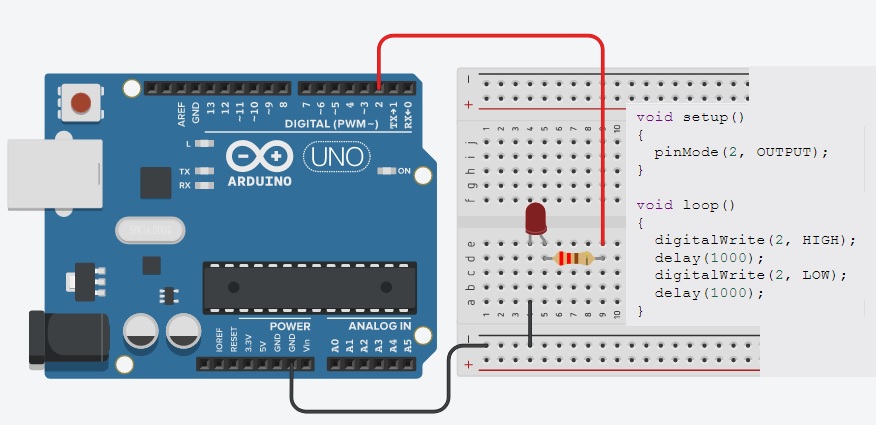
9. Be able to connect an LED to an Arduino pin using bread board and control that LED with an Arduino sketch.
Task List
| Sl.no | Task and Reference |
|---|---|
| 1 | Identify the pins by number on the Arduino Uno  |
| 2 | Configuringthe specified I/O pin as INPUT or OUTPUT: pinMode( pinNumber, mode); pinNumber: Integer (ex: 0-13) that species which pin is to be accessed. mode: constant specifying the pin's direction (INPUT/OUTPUT/INPUT_PULLUP). OUTPUT: program can set the pin's voltage to +5V or 0v INPUT: program can detect a voltage on the pin. example: Digital Output: Digital Input: |
| 3 | Meaning of the constants INPUT and OUTPUT: OUTPUT: A pin can get the voltage from the sketch in OUTPUT mode. The Arduino raises the voltage of the pin to +5Volts (HIGH) / 0Volts(LOW). Pins in OUTPUT mode are used to turn device ON (HIGH) and OFF(LOW) the devices, to control LEDs, to control motors, and to generate sounds. INPUT: A digital pin that isset to detect the presence or absence of +5 volts from an outside source is said to be in the INPUTmode. Such a pin can detect signals from the outside world. Pins in INPUT Mode are used to sense Open/Close of switches, Motion Detection sensors and key board etc. |
| 4 | Writing Digital Output HIGH/LOW (ON-5V/OFF-0V): Try It View |
| 5 | Know the LED: Light Emitting Diodes (LEDs) - A type of diode that illuminates when electricity passes through it. Like all diodes, electricity only flows in one direction through these components. You’re probably familiar with these as indicators on a variety of electronic devices. An LED, or light-emitting diode, is a component that converts electrical energy into light energy. LEDs are polarized components, which means they only allow electricity to flow through them in one direction. The longer leg on the LED is called an anode, it will connect to power. The shorter leg is a cathode and will con¬nect to ground. When voltage is applied to the anode of the LED, and the cathode is connected to ground, the LED emits light.  |
| 6 | Know the Resistor: Resistors - Resist the flow of electrical energy in a circuit, changing the voltage and current as a result. Resistor values are measured in ohms (represented by the Greek omega char¬acter: Ω). The colored stripes on the sides of resistors indicate their value. 
The resistor is a passive electrical component that creates resistance in the flow of electric current. In almost all electrical and electronic circuits they can be found. The current is proportional to the voltage across the terminal ends. This ratio is represented by Ohm’s law: V = I x R V = Voltage I = Current R = Resistance |
| 7 | Find the resistance value:
|
| 8 | Find the current through resistor:
|
Digital Output Vocabulary
Breadboard As a verb, to construct an electronic circuit for purposes of testing. Thecomponents and wires of such circuits are plugged onto a special device designed for this purpose called a bread-board.
Jumper wires The wires that connect components to each other and to the Arduinoonthe bread-board.
Pin A pin is a connection with which the Arduino can be wired to external devices — everything from motors and switches to display panels.
Schematic A drawing shorthand used by engineers to show how components are wired together.
constant A predefined value that is used in Arduinosketches to describe the stateof a pin and the mode of a pin.
current The number of electrons moving per unit of time. The unit of measure is the ampere.
resistor A component that attempts to inhibit the low of electrons, among other uses. In this lesson, a resistor is used to limit the electrical current that goes through an LED.
resistance The tendency of materials to resist the movement of electrons. Metal haslow resistance; glass has very high resistance.
voltage The force of electricity, sometimes referred to as the determination of electronsto move. Lightning, for example, has very high voltage—several hundredmillion volts. A double-A battery, by contrast, has merely +1.5 volts.
HIGH A constant meaning the voltage of a digital pin is +5.
LOW A constant meaning the voltage of a digital pin is zero.
INPUT A constant meaning the mode of a pin is set to sense the voltage being applied from an outside source.
OUTPUT A constant meaning the mode of a pin is being set by the Arduino sketch.This voltage may be used by an outside device connected to this pin.
light-emitting diode (LED)An electronic device that lights up when it is properly connected to anArduinopin set to the OUTPUT mode and HIGH.
Ohm's LawAn equation that deines the mathematical relationship of voltage, current,and resistance.