Serial Communication
Serial communications provide an easy and flexible way for your Arduino board to interact with your computer and other devices.This communication used to interact with sensors or other devices connected to Arduino.Serial communication is also a handy tool for debugging. You can send debug messages from Arduino to the computer and display them on your computer screen.

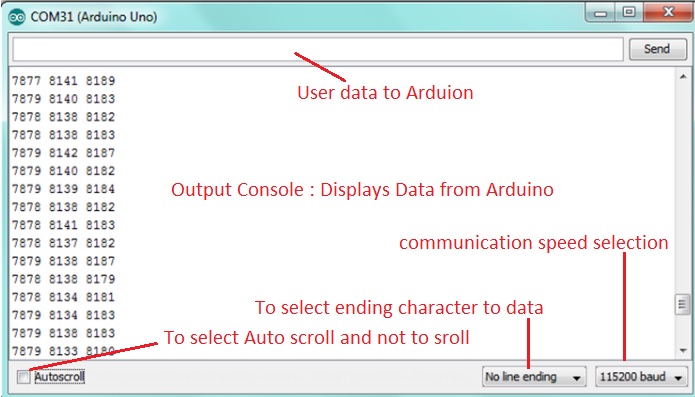
The Arduino IDE provides a Serial Monitor to display serial data sent from Arduino.
You can also send data from the Serial Monitor to Arduino by entering text in the text box to the left of the Send button.
Serial communications involve hardware and software. The hardware provides the electrical signal between Arduino and the device to talking. The software uses the hardware to send bytes or bits.
Serial Hardware:
Arduino uses serial port to send and receive data (zeros and ones that carry the information). Using 0 volts (for 0) and 5 volts (for 1) is very common. This is referred to as the Transistor-Transistor Logic(TTL) level (first implementations of digital logic) The serial port send data out pin 1 of the Arduino and receive it via pin 0. These pins are marked TX fortransmit and RX for receive.
Note:Some serial devices use the RS-232 standard for serial connection. These usually havea nine-pin connector, and an adapter is required to use them with the Arduino. RS-232 voltage levels not compatiblewith Arduino digital pins.
Serial Software:
We will usually use the built-in Arduino Serial library to communicate with the hardware serial ports. Serial libraries simplify the use of the serial ports by insulating youfrom hardware complexities.
Learning Objectives:
1. Know how to find and open the Serial Monitor.
2. Know that the Arduino pins 0 and 1 are used to receive and transmit data.
3. Know that the serial port is configured in the setup method and that the rate of data exchange is set at this time. Understand that the Arduino IDE includes a tool called the Serial Monitor for exchanging text with the Arduino.
4. Know how to invoke the text transmission from the Arduino to the Serial Monitor using the C-language statements Serial.print() and Serial.println().
5. Be able to write, save, upload, and run simple programs for the Arduino.
Task List
| Sl.no | Task and Code Reference |
|---|---|
| 1 | Find the serial monitor icon |
| 2 | Get familiar with Serial monitor screen: |
| 3 | Configure the serial port in the setup method.
void setup(){ |
| 4 | Print Hello! World message on serial monitor.
void setup(){Note: Observe result in Serial monitor |
| 5 | Reaing Serial Data (ASCII)
void setup() {Note: send your name and observe result in Serial monitor |
| 6 | Reaing Serial Data (Srting)
void setup() {Note: send your name and observe result in Serial monitor |
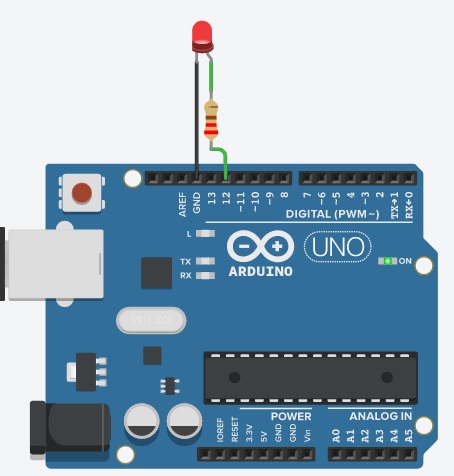
| 7 | Contol LED from Keyboard

void setup() {
|
| 8 | Contol LED from Keyboard
void setup() {
Try It View |
Serial Communication Vocabulary
Serial.begin (speed): Opens the serial port and sets the baud rate for serial data transmission. The typical baud rate for communicating with the computer is 9600, although other speeds are also supported, i.e., 300, 600, 1200, 2400, 4800, 9600, 14,400, 19,200, 28,800,38,400, 57,600, or 115,200. It should be noted that the digital pins 0 (RX) and 1 (TX) cannot be used at the same time when using serial communication.
Baud Rate: A unit of measure of the speed of data going into and out of a serial port.
Serial.available(): Receives the number of bytes (characters) available for reading from the serial port.
Serial.print(val): Prints data to the serial port as human-readable ASCII text.
Baud or baud rate: A unit of measure of the speed of data going into and out of a serial port. Baud is a measure of data transfer speed. Examples: 2400,4800, 9600
Debugging: Finding and fixing improper behaviours in an Arduino sketch (and in othercomputer programs).
serial library: A set of pre-written C-language instructions that are used to send andreceive data via a serial port.
serial port: A service built into each Arduino speciically to send to and receive datafrom outside devices, including another computer.
Serial Monitor:A feature of the Arduino IDE that allows sending text to and getting text from the sketch running on the Arduino. It is a tool for exchanging text with the Arduino